Television is rather a frightening business. But I get all the relaxation I want from my collection of model soldiers.
Peter Cushing
Showing posts with label pigments. Show all posts

Sunday, 23 February 2020

Fearsome Engines

"The Legio Pythia - known colloquially as the Noctis Pythonis, the Night Witches - saw heavy fighting along the spinward front. The specialised in devastating hit and fade attacks previously thought impossible with Titans. Although many of their forces were lighter Reaver and Warhound pattern engines, the Traitor Legios quickly learned to fear the appearance of a Warlord in the Purple and Black livery of the Night Witches." 

From Fearsome Engines: A History of the Legios on the Spinward Marches, Ayjaypee T'Lar, Mars University Press, m40.231


As a youth in the late 80s I had many a fun afternoon playing Adeptus Titanticus. Epic never really got a handle on me, but the simple joy of tooling around a city with a giant stompy robot and smacking seven bells out of other giant stompy robots went straight to the Godzilla part of my brain.

Unfortunately the rereleased version of the game last year was massively too expensive for me to buy. But this last week they released a new starter set with four titans, two knights and all the gubbins you need. So obviously I was going to buy it. I also through through the project and bought some scenery - as the challenge with painting these is to sell the size of the titans (180' tall!) and some magnets.

To start with, I built the titans and all the weapon variations. I added 3x1mm magnets meaning that the weapons can be swapped out depending on how I choose to run my titans for any given game. It sound fiddly but compared to my previous experience wiht magnets it was a piece of cake. The difficult thing was as always checking the polarity of the magnets before superglueing and working out which parts of the ball joint to sever with the dremel.


As you can see they slip together very easy. 


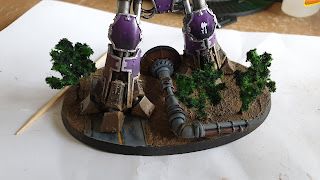
I also added some of the scenery to the bases to help with the scale. It turns out that Vallejo diorama paste is pretty much the right scale. 


Painting wise is used the same workflow as for the Knights of varying sizes by keeping the armour plates seperate for airbrushing while the skeleton is painted with metallics and drybrushing.

The plates were done with purple and then shaded to black with Black Contrast. The Contrast paints are very interesting used in an airbrush. Being quite translucent anyway they can be sprayed at quite high psi without thinning and used as a filter.


Then a big old gloss varnish to give some depth. 


The various limbs were then painted with blacks and purples and given a massive dose of painted gloss varnish as well. 


Trim was painted with a very bright silver. 


The contrasts came out again to get an engine glow in the exhausts - they are very good for wet blending and so with one three colours you can get a very nice effect. 


There's an awful lot of bits for final assembly!


My other purchase was some N-Gauge model railway trees. I just added some different shades of green to make them less vibrant. 


And then the final touch was some weathering pigmets to finish off the bases...


...and to tie the Titans into the bases.


And so the final effect is, I think, quite effective. 


I am very happy with how these look. Next up will be some teenty tiny Knights and then some traitor Titans. 

Oh, and while I was on, I decided to jazz up the arc templates for the game... 


Sunday, 18 November 2018

Dasvidaniya Rodina


The Soviet T-34 was the tank that won the war. With its revolutionary design and the ruthless industrial might of the USSR behind its construction, it helped halt wehrmacht advance and turn the tide of the war. After watching me building the submarine, the Eldest asked for a model of his own; when he asked for a tank, I knew there was only one to make him. Along the way - although I knew this would be a display model -  I experimented with a few new techniques I intend to use on some wargaming miniatures.

Apologies but this going to a very detailed and pic-heavy post as I want to recrod step by step what I did for fufutre reference.

Step one, as always, was construction.

There were a few buts that needed filling. 


Sealing the rubber tracks required a bit of medieval technology....


But we ended up with a final piece. 


I painted the interior of the turret and breech - althought it seemed very unlikely you'd see in. 


making the antenna used the same candle to stretch some sprue - this is the first time I'd ever done this; normally I'd use very thin brass rod. 


Now onto the new techniques. I airbrushed the whole thing in rust tones (actually the same as Uruk Hai flesh but with orange patches. 


Then I hit the whole thing with Chipping Fluid and let it dry for an hour. 


Then I sprayed my base colour; given the historical variation in green paint used across just 1943 alone, I didn't feel too constrained. 


Then I started chipping the base colour off, revealing the rust beneath. 


Once happy with the overall look of the first layer of subractive weathering, it was timeto start adding. The first was a layer of grime - very, very thin smoky ink in this case. 


 I added the decals and then scraped them off to match the chipped paint beneath.


Then detail painting of the stowage and metal chipping added with a brush and sponge on some hard corners.


The painting of the tank was now finished. 


 Time to star weathering. This was all done with pigments and airbrush thinner or binder. First, a very thin mix is used to paint dest streaks on all flat areas.


Then a thicker mix with binder creates a paste which becmes mud on the tracks, mudguards and undersides. 


Finally a thin mix is gathered onto a flat brush and flicked on a cocktail stick; this creates mud splashes all over the sides, front and rear. 


Now it was on to the loader, peering out of the hatch to direct the tank. This turned out to be phenomenally easy - 1/35 is significantly larger than 28mm. 


 I was even able to add bags under his eyes and stubble.


A final daylight test to checkl the colours...


And on to the base. One tip I picked up from the Vallejo youtube tutorials was to use cheap picture frames on the bases - it's amazing how much more professional it makes the thing look. I roughed out the basic look...


Then libreally coated with polyfilla - making sure to create tracks for the tank. 


At this point adjusted the mud on the wheels having now got a feel for what the ground will look like. 


Aibrushed the base, making sure to change the colour of the disturbed mud where the tracks had churned it up. 


Static grass added


And then cracked the old favourite leaf punch out. 


And added some water effects in the deeper puddles. 


It was then just a matter of gluing the tank down and blending in some more pigment mud paste. 


The final piece: